October 23, 2022
How to Add Taxonomies to your Hugo Site?

Md. Saad

Taxonomies are classifications of logical relationships between content. It creates a group of content. By default, HUGO has two taxonomies. These are tags and categories. But you can create custom taxonomies also and disable taxonomies if you want.
How It Works
Taxonomy is the classification and contains terms (consider as keys) and values assigned to terms. For example, within tags, we have the term“Professional ”
Default Taxonomies
Hugo natively supports Taxonomies. Without configuring anything in config.toml file, Hugo will automatically create taxonomies for tags and categories. We have to just add these to our content file and give them values. Then use the proper code(we will discuss it later) and it will show these taxonomies.
Custom Taxonomies
Though Hugo provides us with default taxonomies, we can also add our own. To add custom taxonomies, we must define them in config.toml file. Remember, You need to provide both the plural and singular labels for each taxonomy. An example of adding a custom taxonomy named mood is given below.
[taxonomies]
category = 'categories'
tag = 'tags'
mood = 'moods'While adding custom taxonomies, you must also put in the default ones if you want to keep them.
Note: If you do not want Hugo to create any taxonomies, set disableKinds in your config.toml file to the following:
disableKinds = ['taxonomy', 'term']Adding Taxonomies to the Content File
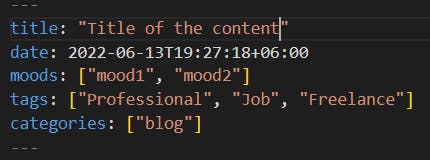
G to the content folder. Inside the content folder, there will be .md file. We have to add taxonomies here. Terms of a Taxonomy are added in the front matter. Simply create a variable using the plural name of taxonomy from config.toml file and assign all terms you want to apply to the content. Your code should look like the following codes.
Show Taxonomies in Template
Showing taxonomy on a page is very easy. You just have to use the following code.
{{ range .Params.tags }}
<a href="{{ "/tags/" | absURL }}{{ . | urlize }}"> {{ . }}</a>
{{ end }}** Change tags according to your taxonomy name. For example, if the taxonomy name is moods, then the code will be like
{{ range .Params.moods }}
<a href="{{ "/moods/" | absURL }}{{ . | urlize }}"> {{ . }}</a>
{{ end }}Showing Terms template and Taxonomy Template
Hugo automatically generates a taxonomy link for each taxonomy term. We have to just create the template properly and added them to the taxonomy term links.
In the layouts folder at first, I have added a folder using the name of the taxonomy. In case your taxonomy name is “tags”, then create a folder naming tags inside the layouts folder. And the directory will be layouts/tags
Now to show all the terms of the taxonomy “tags“, First, we have to create a file terms.html.
Add the following codes to show all the terms pages on the terms.html page.
{{ define "main" }}
<div class="container">
<div class="row">
{{ range .Data.Terms.ByCount }}
<div class="col-md-4 mb-3">
<div class="card">
<div class="card-body">
<div>
<a class="title is-5 is-size-6-mobile" href="{{ .Page.Permalink }}">{{ .Page.Title }}</a>
{{ $Totalpage:= len .Pages }}
<p>{{ $Totalpage }} post{{ if ne $Totalpage 1 }}s{{ end }} </p>
</div>
</div>
</div>
</div>
{{ end }}
</div>
</div>
{{ end }}Note: To keep it simple I have used the bootstrap default layout. You can use others also or use your CSS code.
As we have added successfully the terms.html page and shown data there, all we need to add the taxonomy.html page. It will show all items of particular taxonomy terms. So, Create a file layouts/tags.taxonomy.html with only the main definition:
{{ define "main" }}
{{ end }}Inside the main definition, now write code to show data for the terms. These codes are the same as a list.html page. Suppose you have added tags for blogs, and to show their title, date and tags, then the code will be like the following codes.
{{define "main"}}
<div class="container">
<div class="row">
{{ range .Pages }}
<div class="col-md-4">
<article class="card">
<div class="card-header">
<h2 class="blog_post_title"><a href="{{.Permalink}}">{{.Title}}</a></h2>
<p>{{ .PublishDate.Format "2 January, 2006" }}</p>
<ul class="list-inline ">
{{ $taxo := "tags" }} <!-- Use the plural form here -->
{{ with .Param $taxo }}
<strong>Tag{{ if gt (len .) 1 }}s{{ end }}:</strong>
{{ range $index, $director := . }}
{{- if gt $index 0 }}, {{ end -}}
{{ with $.Site.GetPage (printf "/%s/%s" $taxo $director) -}}
<li class="list-inline-item"><a href="{{ .Permalink }}">{{ $director }}</a></li>
{{- end -}}
{{- end -}}
{{ end }}
</ul>
</div>
</article>
</div>
{{end}}
</div>
</div>
{{end}}
How to Set Up a Multilingual Website in Hugo
Wrap-Up
And that’s all. We have successfully created terms.html and taxonomy.html files for the taxonomy “tags”. For other taxonomies such as categories or any custom-made taxonomies, follow the same steps.
