December 28, 2023
How to Start with Next.js app from Scratch (Beginner Guide)

Md. Saad

Next.js is a popular React-based web framework that simplifies the development of dynamic and server-rendered web applications. It provides a powerful and flexible environment for building modern, responsive, and performant web pages. With features like automatic code splitting, server-side rendering, and a comprehensive plugin system, Next.js optimizes both developer experience and application performance. It supports seamless client-side navigation, making single-page applications easy to create.
Additionally, Next.js offers a zero-config setup for quick project initiation while allowing customization through configuration files. Its strong integration with React and efficient handling of server-side rendering contribute to building scalable and SEO-friendly applications. As it is becoming extremely popular in the community and among developers, in this article, we will discuss step by step approach to getting started with Next.js.
Pre Requisite on Next.js
Before diving into Next.js, I will assume that you have a basic understanding of the following technologies:
👉 Javascript
👉 React Js
👉 Node Modules
👉 HTML/CSS
Next.js Installation Guide
To get started with Next.js, you can follow these steps:
👉 Ensure that Node.js and npm are installed on your machine. You can download them from the official website: Node.js.
👉 Now, open your terminal and run the following command to create a new Next.js app:
npx create-next-app next-app👉 On installation, you'll be asked some questions about project configuration. Next.js by default uses Typescript, but for this project, we will use javascript. You will see the following questions:
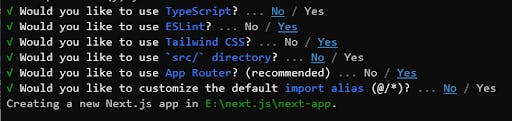
After answering all the questions, create-next-app will create a folder with your project name.
👉 Now navigate to the project using the following command.
cd my-next-app👉 Install All the dependencies using the following codes:
npm install👉 Now, start the development server by running:
npm run dev👉 This command starts your Next.js app on http://localhost:3000 by default.
👉 Open your web browser and navigate to http://localhost:3000 to see your new Next.js app.
At this moment, the project structure is all set and we are ready for customization. Before that let’s discuss the folder structure.
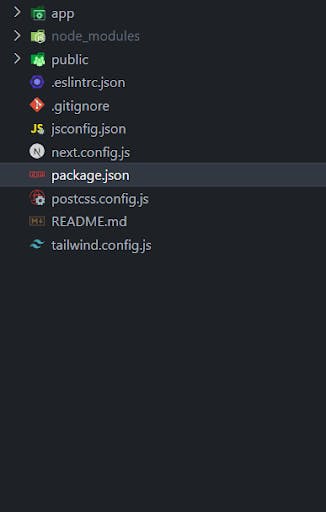
Let’s check out each folder and its uses.
App Directory
Before Next.js 13, the Pages Router was the main way to create routes in Next.js. It used an intuitive file-system router to map each file to a route. The Pages Router is still supported in newer versions of Next.js, but Next Js recommends using the new App Router. This will help This router allows you to use React's latest features. Let's see the app directory.
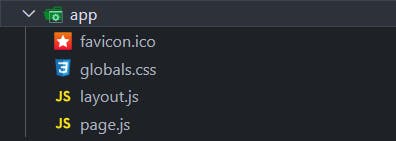
👉 The page.js file serves as a route or path definition in a webpage, taking its name from the folder within which it resides. If placed in the root (app) directory, it maps to the homepage (/) of the website.
👉 The layout.js file defines the layout for a particular route if placed in a folder. However, when placed in the root (app) directory, it becomes the layout for the entire web application. Consequently, all descendant routes inherit the layout specified in this file.
👉 To create specific routes, such as /blog, create a folder named blog within the app directory. Inside this folder, include a page.js file that exports a function component. For example:
import React from "react";
const BlogPage = () => {
return (
<div>
<h1>Welcome to the Blog Page!</h1>
{/* Additional content for the blog page */}
</div>
);
};
export default BlogPage;After running the server and navigating to /blog, you'll encounter a page displaying the heading "Welcome to Blog Page." In Next.js, all components and routes within the app directory are server components by default. Server components do not support client-side interactions like forms. To enable client-side components, you have to include "use client"; at the beginning of the page.js file where you want to use it as a client component. For example:
"use client";
import React from "react";
const BlogPage = () => {
return (
<div>
<h1>Welcome to the Blog Page!</h1>
{/* Additional content for the blog page */}
</div>
);
};
export default BlogPage;By adding the “use client “ directive, you specify that this particular page is intended for client-side rendering, allowing the incorporation of client-side interactions like forms. This distinction allows for flexibility in handling different components based on their requirements in a Next.js application.
Dynamic Routes
We have already seen how to create a static route but what should we do to create a dynamic route? Suppose we have to create route for each blog post. Then we have to create a /blog/[slug] folder. Now, again create a page.js file inside the [slug] folder. Now paste the following code inside it.
"use client";
import React from "react";
const BlogSinglePage = ({params}) => {
const {slug} = params;
return (
<div>
<h1>Welcome to the Blog Page {slug}!</h1>
{/* Additional content for the blog page */}
</div>
);
};
export default BlogSinglePage;To get the value of the slug from the path, we use the params prop. The params object is directly destructured in the function component, allowing you to access the slug directly and fetch data based on the dynamic parameter.
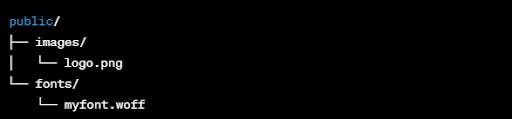
Public Directory
This folder serves static assets such as images, fonts, or other files. The contents of the public folder are served at the root level of your application.
Example structure:
node_modules
This is all of the Node.js download dependencies needed for the project.next.config.js
Project-specific Next.js options, such as choosing the experimental app directory and storing external pictures, are kept in this file.
package.json
The list of packages or dependencies used by the Next.js project is kept in this file.
Tailwind.config.js
This file is to configure tailwind to use in the next js app.
Components
You can add a custom folder also. Suppose you want to create components to use in the project. Then create a /components folder and add your components in that folder. Later you can use them in your next js pages..
Example structure:
So far, we have learned how to set up a Next.js app and its folder structure. By following these step-by-step, you can start your journey as a Next js Developer easily. To learn more on Next.js visit the official documentation for Next.js at https://nextjs.org/docs and the release notes at https://nextjs.org/blog. These resources will help you stay informed about the latest developments and best practices when working with Next.js.
If you're searching for top-notch Next.js developers, your ideal destination is StaticMania. We are the perfect choice for Next.js development. Don't hesitate to reach out and discuss your project with us!
